
In this guide
A well-balanced wet central-heating system can help your rooms warm more consistently without forcing the quickest radiators to take most of the available flow. The job is not about making every radiator equally hot. It is about setting the relative resistance through each radiator so water is distributed more appropriately around the whole circuit.
Balancing is a whole-system adjustment. A change at one radiator affects the others, so the process starts from cold, uses small lockshield adjustments and ends with a system-wide retest.
What radiator balancing changes
Heated water naturally favours the lower-resistance paths through a central-heating circuit. A radiator on an easier branch may warm quickly, while one on a more resistant branch can take longer. Restricting the easy path at its lockshield valve leaves more flow available for later radiators.
The aim is more consistent room warm-up, not identical surface temperatures. Room heat loss, radiator output, control settings and pipe layout still affect performance. Balancing will not correct an undersized radiator, blockage, leak, pump problem or boiler fault.
Is it balancing, bleeding or flushing?
The pattern of the problem helps you choose the right first check, but it does not prove a diagnosis:
- Bleeding releases trapped air. A radiator that is cool near the top often points towards air in the radiator.
- Flushing removes contamination from inside the system. A persistently cool lower area can be linked to sludge, restricted circulation or another fault, so it needs assessment rather than an automatic assumption.
- Balancing adjusts the relative water flow through every radiator. Large room-to-room temperature differences or radiators that warm at noticeably different speeds can indicate imbalance.
If trapped air is indicated, deal with it before judging the system balance. Follow the radiator bleeding guide for that separate task. For persistent lower cold areas or suspected contamination, read the radiator flushing guide and arrange competent assessment where needed.
Tools and safe preparation
- A radiator bleed key if air needs to be released first
- A flat-head screwdriver where the valve design requires one
- A lockshield key or adjustable spanner
- A suitable contact thermometer or paired temperature probes
- Notes for recording the warm-up order and original lockshield positions
- Protective cloths for minor drips
Turn the heating off and allow every radiator and its pipework to cool fully before starting. Identify the user control valve and the capped lockshield on each radiator. Do not assume that flow is always on the left or return is always on the right. Record the existing lockshield position where possible so you have a reference.
Do not force a seized valve. Stop if a valve leaks, a cap appears fragile or damaged, you cannot identify the valves confidently, or access cannot be made safe.
Know which valve does what
The user control valve is either manual or thermostatic. It governs normal room demand. A thermostatic radiator valve, or TRV, responds to the room setting by changing the flow through that radiator during everyday use.
The lockshield normally preserves the radiator's balancing restriction. Its cap discourages casual adjustment because changing it alters how the whole system shares water. Either valve can be fitted on either side, so flow and return direction must be established through consistent pipe-temperature measurement or reliable system knowledge.
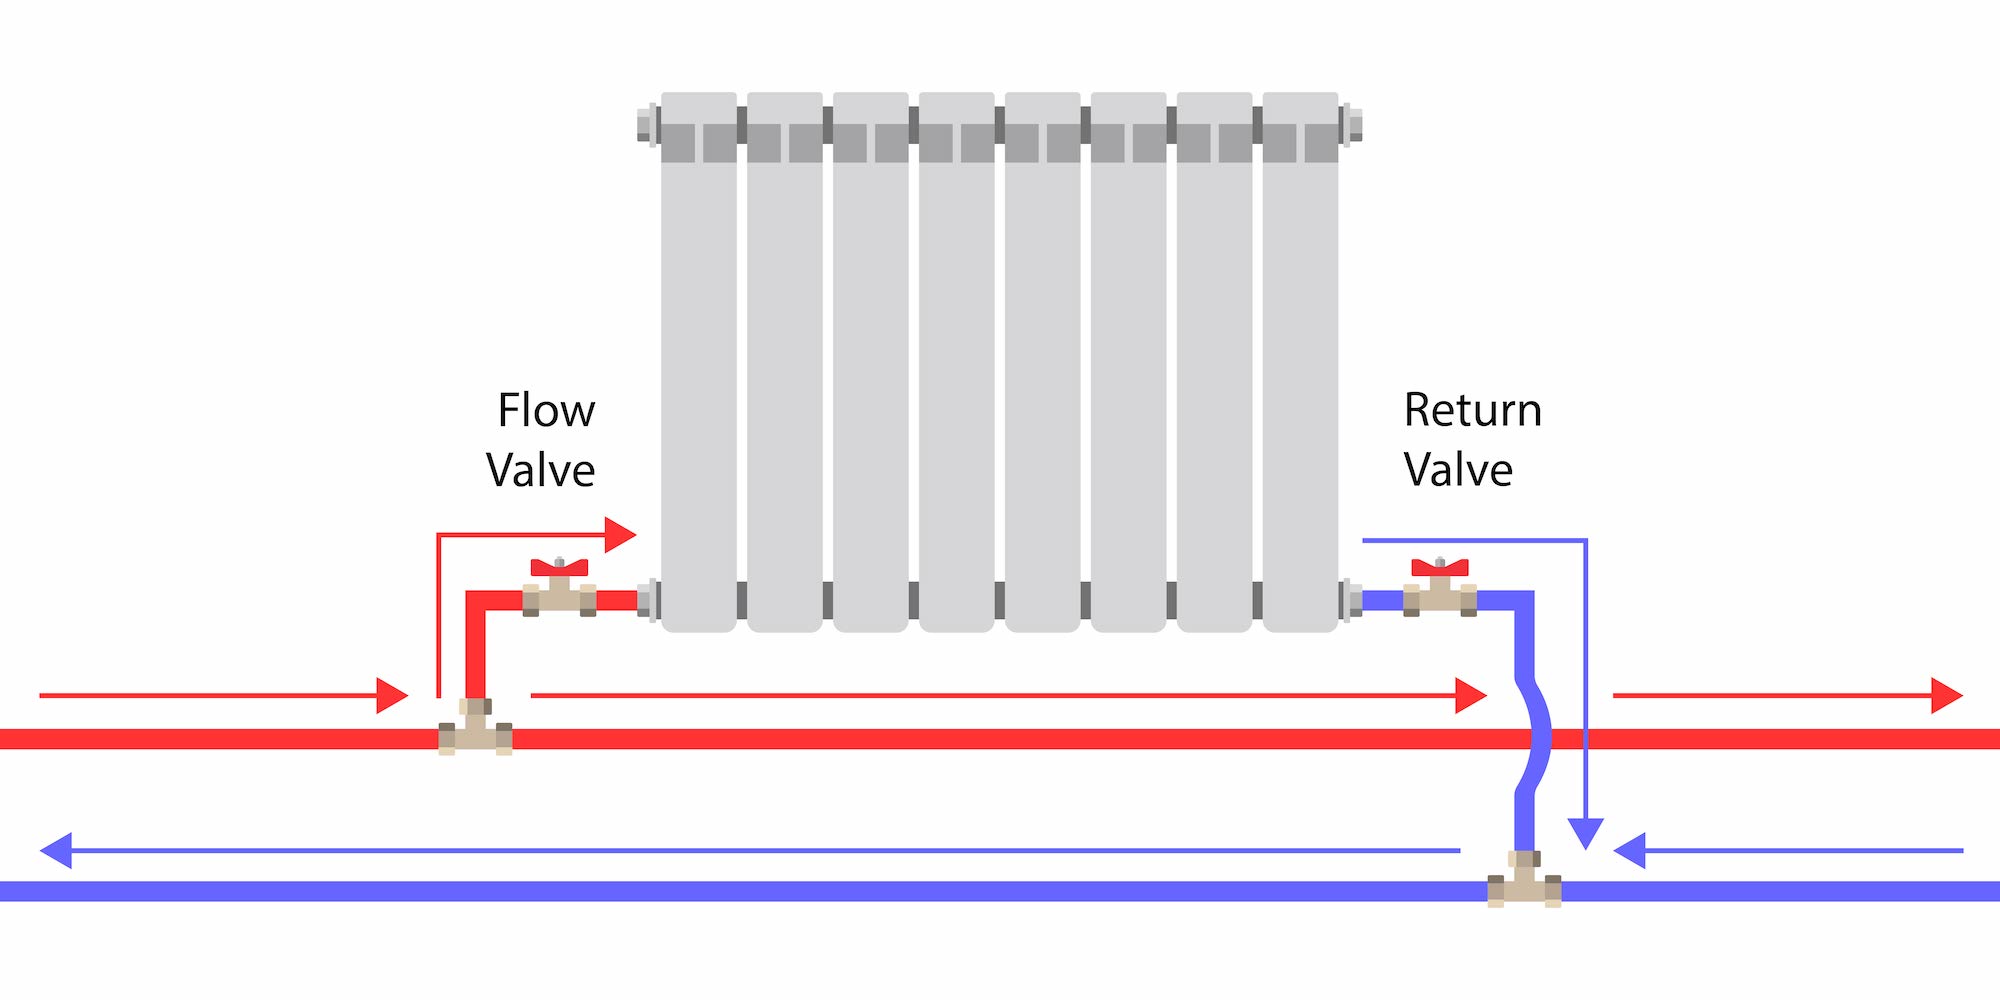
The diagram shows the principle of hot flow entering a typical radiator and cooler return leaving it. Real systems can differ. Single-pipe, microbore, zoned and heat-pump layouts may require a different commissioning approach.
How to balance radiators step by step
- Cool the system fully. Switch the heating off, allow every radiator to cool and note each lockshield's starting position where possible.
- Open every radiator. Fully open all manual controls or TRVs and all lockshields. This gives each branch the same open starting condition.
- Start from cold and record the order. Turn the heating on and note the order in which the radiators begin to warm. This identifies the branches receiving heat earliest, but it does not prove their physical distance from the boiler.
- Switch off and cool again. Let the whole system return to a fully cooled state so later comparisons start consistently.
- Restart and begin with the earliest radiator. Close its lockshield carefully, then reopen it in a small increment. Early, fast-warming radiators generally need more restriction than later radiators, but the correct setting comes from measurement and repeated checking.
- Measure flow and return. Use suitable contact probes or a thermometer on the pipes close to the radiator. Keep the measuring position consistent and allow readings to stabilise after every small adjustment. Work towards the temperature differential specified for the heat source, system design and manufacturer. A 12°C drop appears in some balancing methods, but it is not a universal efficiency target.
- Continue in the recorded order. Repeat the careful close-and-reopen process for each radiator. Make small changes and give the circuit time to respond before changing another setting.
- Retest the whole system. Because every adjustment affects the wider circuit, test again from cold and repeat measurements where needed. Once the balance is acceptably consistent, return TRVs or manual controls to their normal room settings while leaving the lockshield settings in place.
Balancing takes patience. The number of radiators, the layout and the time needed for temperatures to settle all affect how long the job takes.
Balancing without a thermometer
Without suitable temperature measurement, you can compare the timed warm-up order and later room response to make a rough assessment. This may show whether an early radiator is still dominating or a later room remains slow, but it cannot confirm a measured temperature differential.
Do not use your hands to judge hot pipe or radiator temperatures. Surface temperatures can cause burns, and touch is not a reliable substitute for consistent measurement. If a measured balance is needed, use suitable equipment or ask a heating engineer.
Balancing radiators with TRVs
Keep every TRV fully open while balancing. A partly closed TRV can mask the available system flow and distort the comparison between radiators. Make the balancing restriction at the lockshield, then restore each TRV to its normal room setting when the system-wide checks are complete.
If a TRV is damaged or genuinely needs replacing, check the required valve type and installation arrangement before browsing thermostatic radiator valves. Buying a new control is not necessary simply because a system needs balancing.
When to rebalance
Balance is normally rechecked when symptoms return or when work changes the way water moves around the circuit. Relevant triggers include:
- Removing or replacing a radiator
- Flushing the central-heating system
- Replacing the boiler
- Replacing the central-heating pump
- Making another significant hydraulic alteration
- Room-to-room warm-up differences returning after previous adjustment
Balancing is not a fixed-calendar maintenance task. A stable system does not need repeated adjustment simply because time has passed.
When balancing is not the answer
Stop and arrange competent help if there are leaks, seized or damaged valves, pressure problems, persistent uneven heating, uncertain valve identification or unsafe access. An unusual single-pipe, microbore, zoned or heat-pump layout may also need system-specific commissioning.
Balancing does not replace diagnosis. Boiler, pump, gas, electrical and invasive plumbing work should be handled by a competent heating engineer. If the system remains uneven after appropriate air checks and careful balancing, another circulation, control, sizing or component issue may be involved.
Your practical next step
Start by identifying the symptom and the two valves on each radiator. If the system is suitable for homeowner adjustment, record the starting positions and work slowly from a fully cooled state. If anything is uncertain, stop before altering the system and arrange professional help.
Where wider heating work or an appropriate replacement component is genuinely required, you can explore the heating collection as a restrained next step after the system requirements are clear.